ETSpilot is an AddIn for ETS 6. You install it once, sign in with your e-mail address and store your AI access. After that, the assistant is available in every project.
1. Install the AddIn
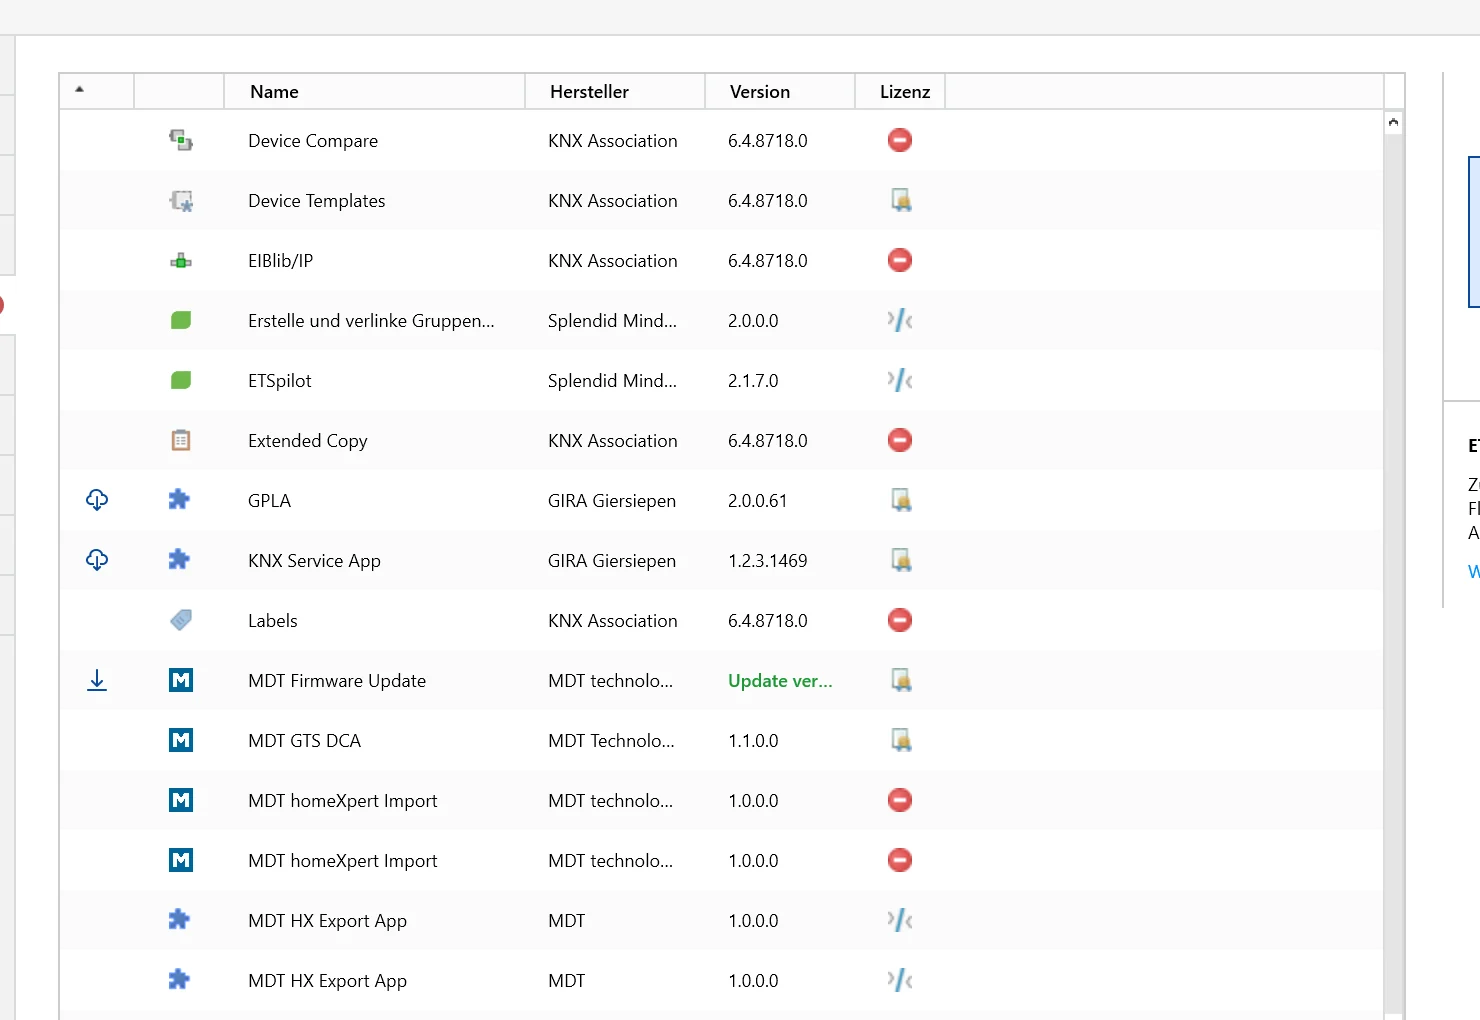
Buy ETSpilot in the KNX Shop under “ETS Apps”.
In ETS 6, under “Settings” › “Licensing”, use “Add license” to select the ETSpilot license and click “Activate”.
Under “Settings” › “ETS Apps”, choose “Install app” for ETSpilot.
Open a project – ETSpilot is ready.
Fig. 1 – ETSpilot in the app management of ETS 6
2. Sign in
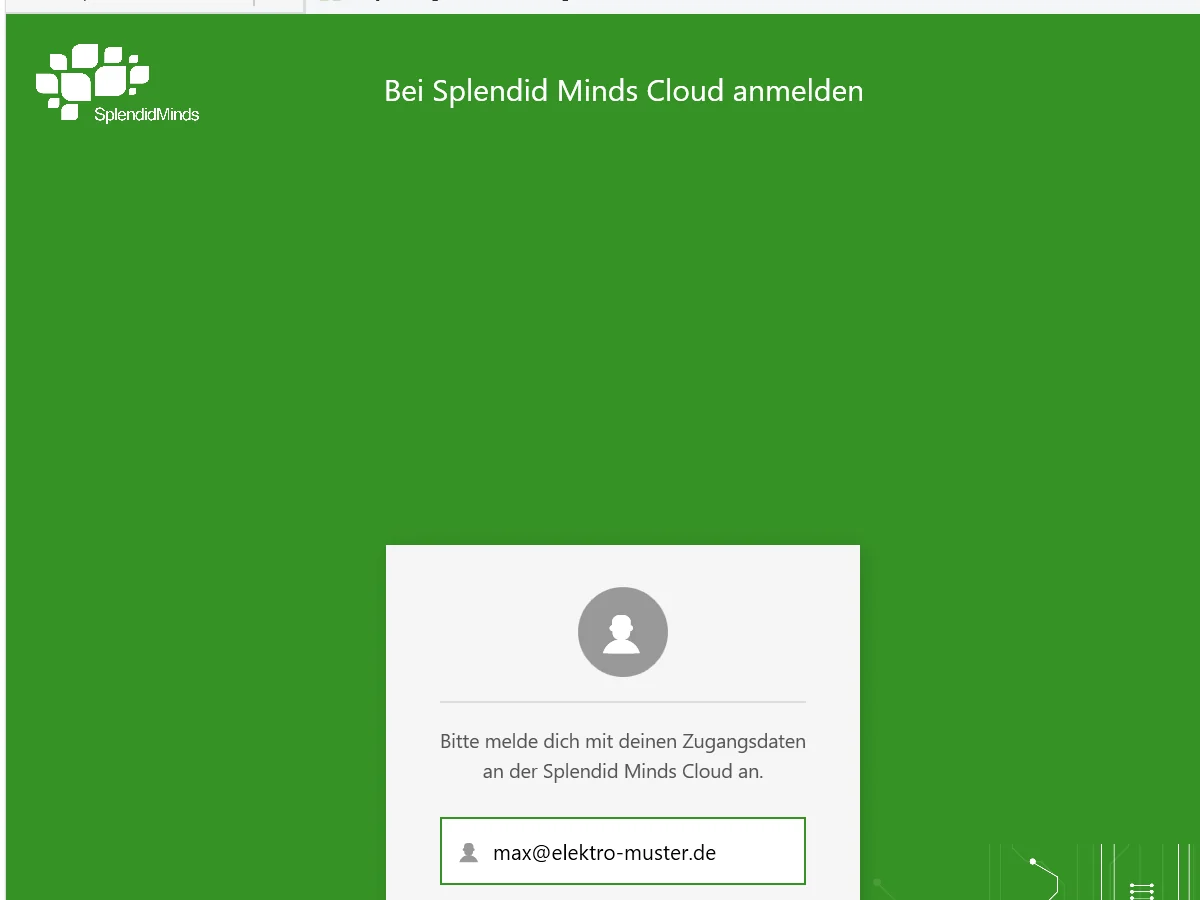
The sign-in appears the first time you open it. You receive a one-time code by e-mail – there is no password.
Fig. 2 – Sign-in with a one-time code
Your AI access (API key) is stored encrypted on our server in Germany and used only for your requests.
3. Set up the project
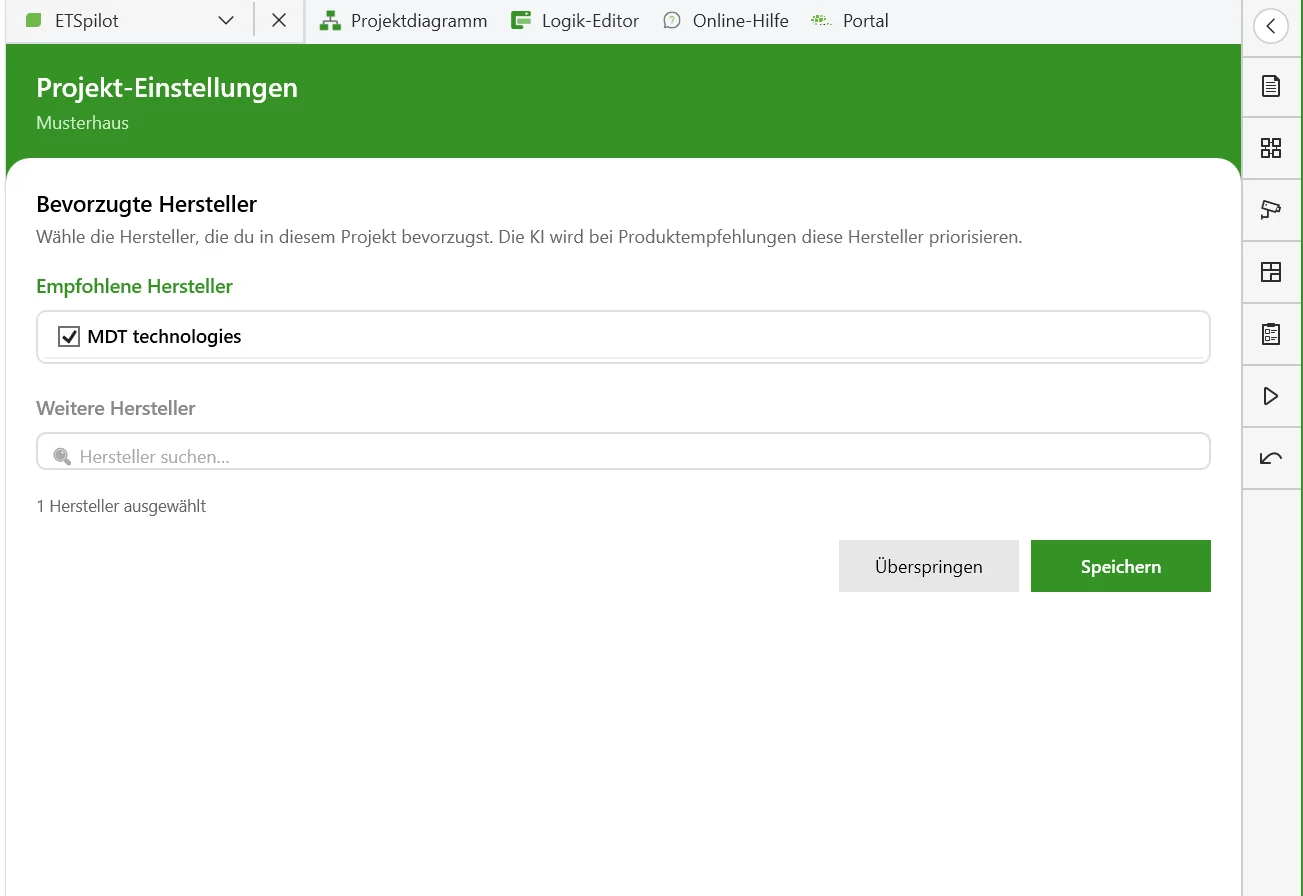
The first time you open a project, you briefly confirm the manufacturers used. A welcome assistant guides you through setup in seven steps: AI key, data protection, pairing with your smartphone, voice input, feedback and four sample questions to get started. You can reopen it at any time via the button in the chat bar.
Fig. 3 – Setting up a project
4. The first task
Open the ETSpilot panel and describe what you need – just as you would tell a colleague. It's best to start with a question that changes nothing, for example “Give me an overview of the project.”
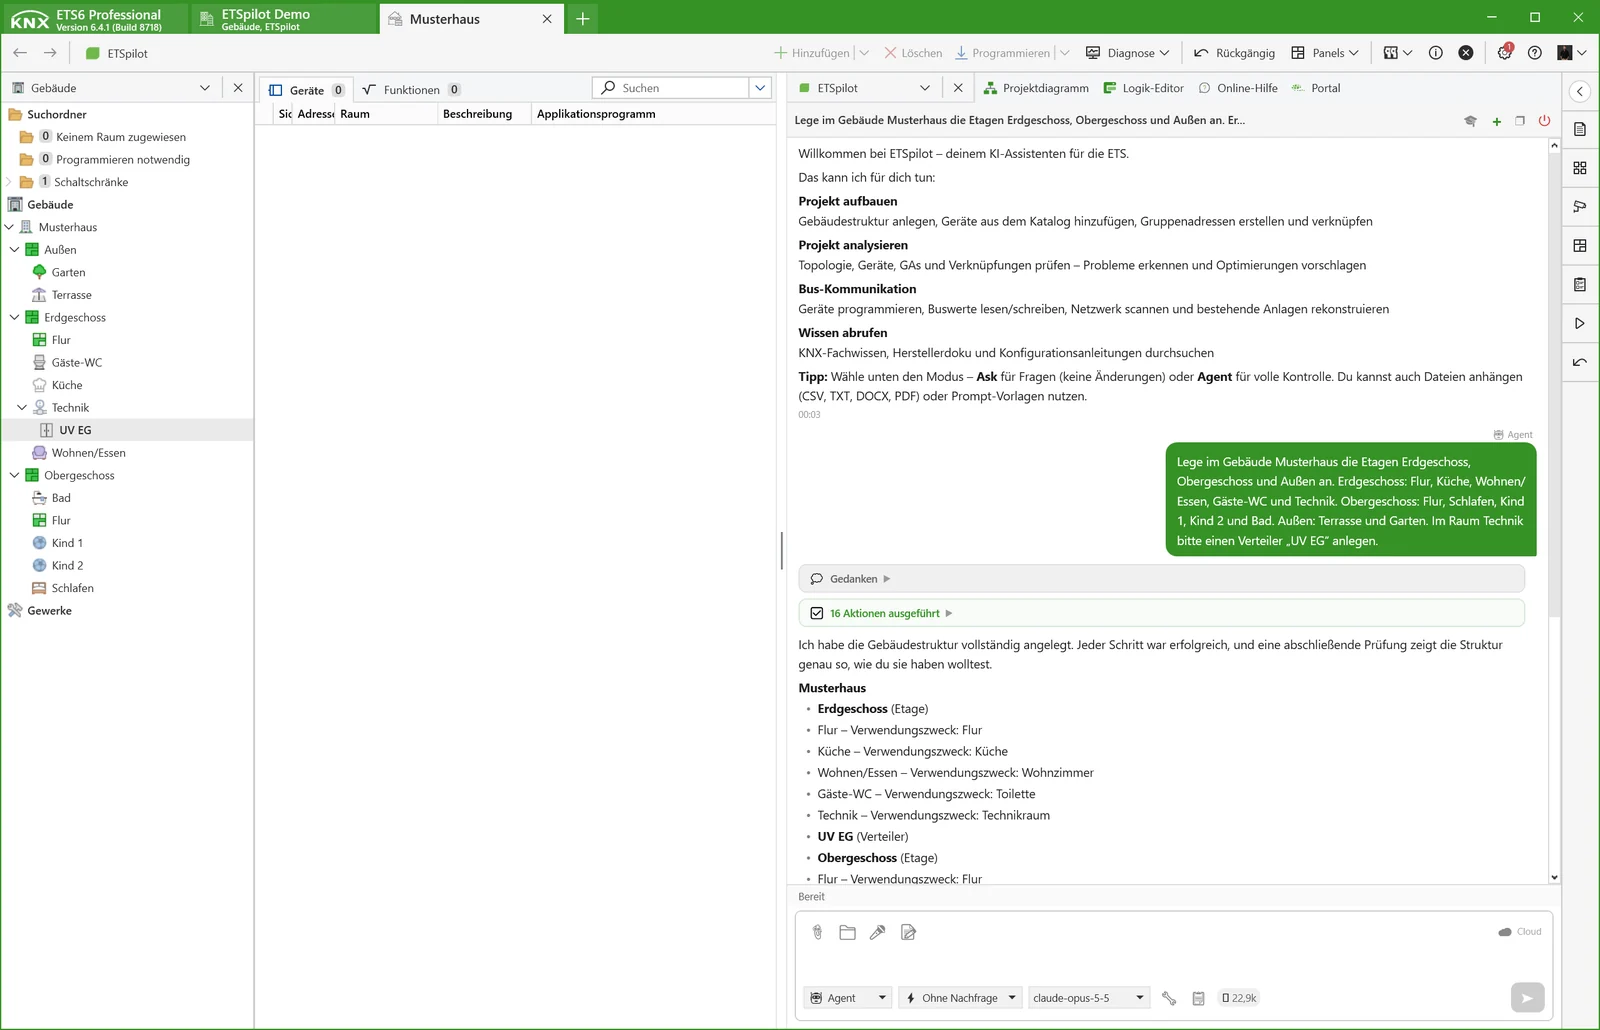
Create kitchen, living room and bathroom on the ground floor and plan the lighting with group addresses.
ETSpilot shows you the planned changes, creates a project backup after your approval and then creates rooms, middle group and group addresses.
Fig. 4 – Result after approval
Documentation › Getting started
Account and AI access
You manage your account in the portal at account.etspilot.de. There you define which AI provider ETSpilot uses and manage projects, documents and your data.
Create an account and sign in
Enter your e-mail address in the portal and accept the terms of use.
Enter the one-time code from the e-mail – done. There is no password.
In the AddIn, sign in with the same e-mail address.
Store your AI provider
ETSpilot works with your own access to an AI provider. This way you keep control over provider, model and costs; billing is directly between you and the provider.
Anthropic Claude or OpenAI: create an API key in your provider account and paste it in the portal under “AI settings”.
Azure: Azure OpenAI with deployment names or the model catalog of Azure AI Foundry. You enter endpoint, deployment and API version in the portal.
After saving, “Test connection” checks whether the key works. You choose the model in the portal or directly in the AddIn via “Switch AI model” in the chat bar.
To analyse photos, you need a model that can process images.
Your data in the portal
Under “Account” you see which data is stored for your account. You can export everything as a JSON file, specifically delete individual data types of a project or delete the account completely. Prompt logs are removed automatically after 14 days, usage data after 400 days.
Documentation › Getting started
The user interface
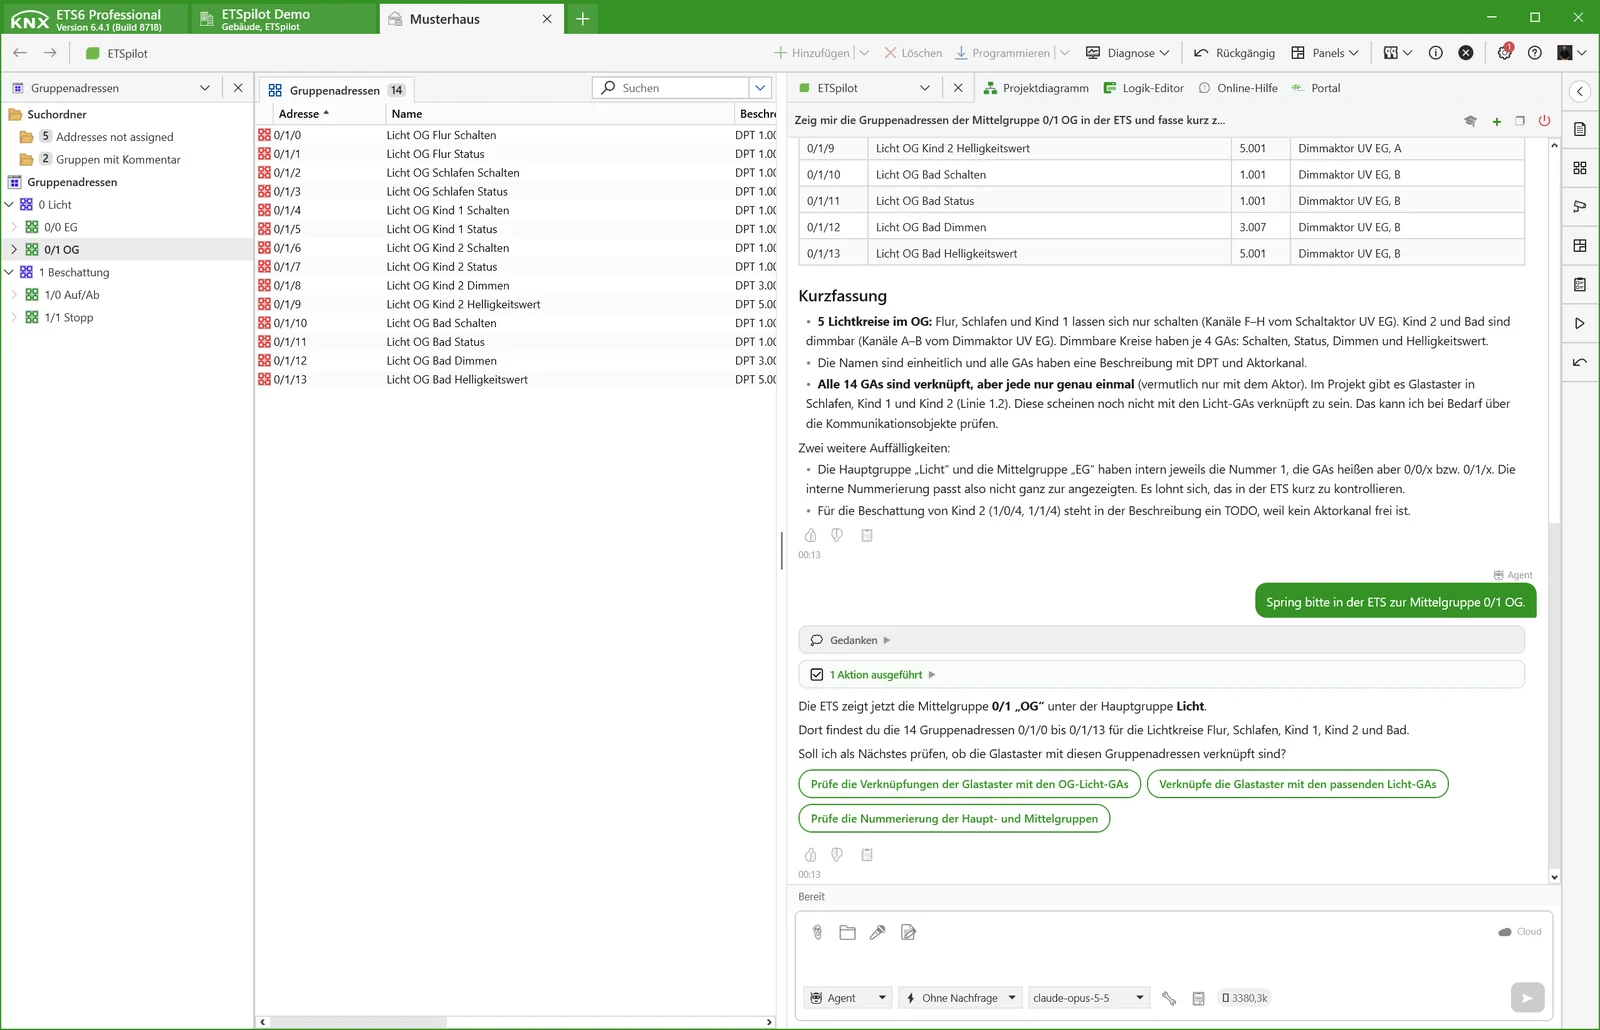
ETSpilot appears as a panel in ETS, next to the project tree. With “Undock window” you can also place it as a separate window on a second screen.
Fig. 5 – ETSpilot panel in ETS 6
Chat and conversations
New chat starts a new conversation. Via the conversation list you open or delete earlier chats. The history always belongs to the respective ETS project.
Thoughts optionally shows which steps the assistant is currently taking.
Good answer / Bad answer rates an answer. The rating, the reason and the rated answer are transmitted so that we can trace the cause.
Copy answer copies an answer to the clipboard. With Cancel processing you stop a running request.
The chat bar
Ask and Agent: In Ask mode, the assistant only answers questions and changes nothing. In Agent mode, it may edit the project – with the approvals you define.
Ask first / No prompts: defines whether you are asked before every writing step (see Approvals).
Switch AI model, Prompt templates (default templates and your own), Attach file, Dictate and the Project folder for planning documents.
Cloud connection: pairs the smartphone app with ETS via QR code.
Settings
In the Settings you choose language, model, the automatic project backup and the debug mode, which shows the raw requests to the AI. Under Project-specific settings you store instructions for the current project and define data locks.
Documentation › Working with the assistant
Phrasing good tasks
ETSpilot knows your open project: building, topology, devices, parameters and group addresses. So you don't need to explain anything that is in ETS – only what you want to achieve.
How to get there faster
Goal instead of click path: “Create a middle group Lighting for every room on the first floor” instead of individual work steps.
State the scope: narrow down by floor, line, main group or device – this saves time and avoids surprises.
Specify a naming scheme: “Rename using the pattern ‘Room – Function’”. Recurring conventions belong in the project instructions.
Ask first, then change: In Ask mode you can have the plan shown to you before implementing it in Agent mode.
Use documents: put the distribution board plan or room list in the project folder and refer to it.
Examples
Which group addresses have no sender?
List with address, name and linked receivers – as CSV on request.
Set the travel time of all blind actuators to 60 seconds.
List of changes per device and channel for approval, value checked against the permitted range.
Link 1/1/3 to the switching object of channel A of actuator 1.1.2.
If several objects match, ETSpilot asks instead of guessing.
You can find more proven tasks in the Prompt gallery. Save frequently needed tasks as your own prompt template.
Manufacturer knowledge
For selected products (initially WAREMA), the assistant knows the parameters of the application program with clear names, manuals and product data. Products appear in the chat as an article card with image and links.
Documentation › Working with the assistant
Approvals and undo
You decide how much ETSpilot may do on its own. Reading steps always run without asking, writing steps only as you have configured.
Approval mode
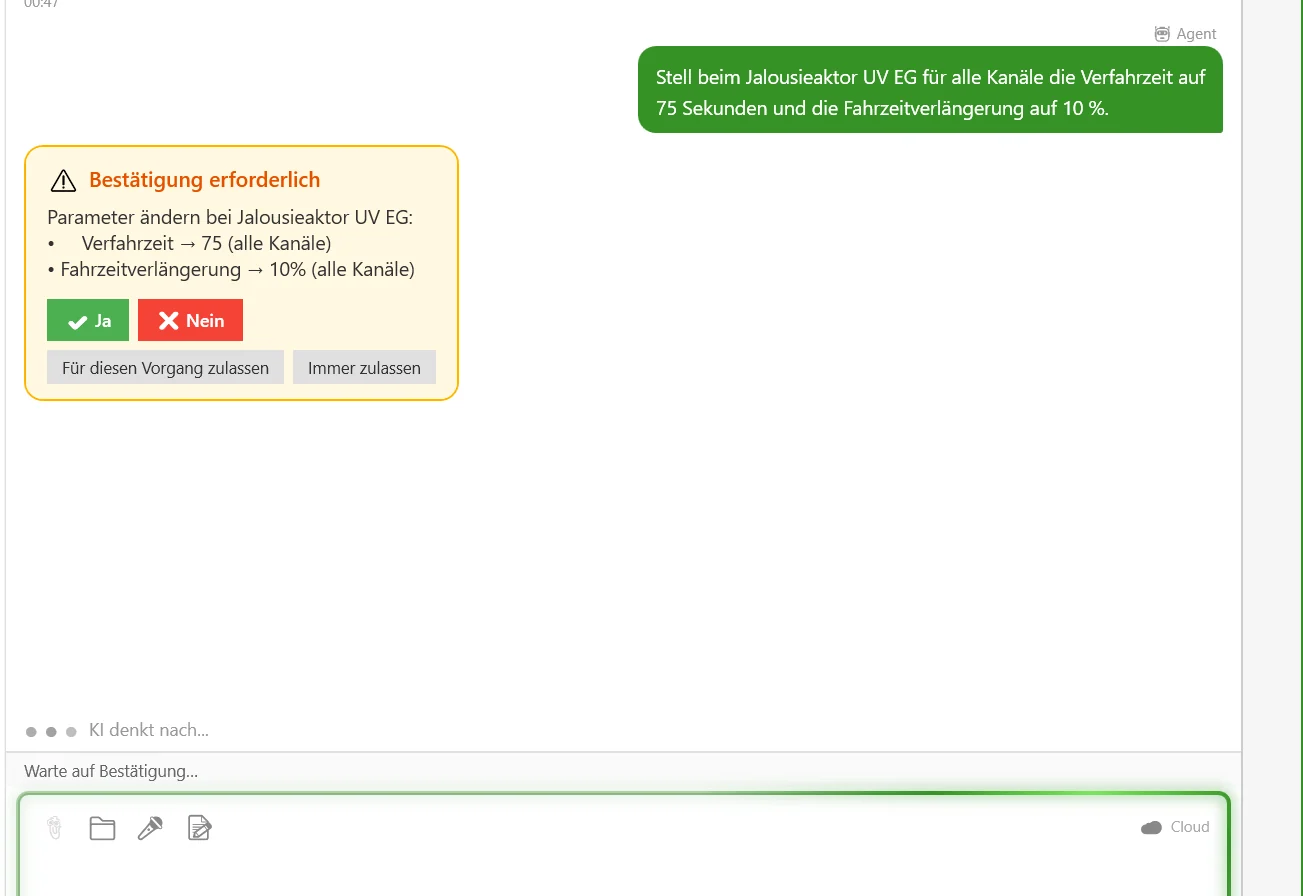
Ask first (recommended): Before every writing step, an approval appears with the planned changes – for parameters with device, parameter, new value and channel.
No prompts: The assistant carries out all steps directly. It still asks follow-up questions about the task.
In the approval you choose Yes, No, Allow for this operation (no further questions in this request) or Always allow (for this type of action).
Fig. 6 – Approval before a change
If the assistant works on a task for a longer time, it pauses after a number of steps and asks whether it should continue.
Automatic project backup
Before writing actions, ETSpilot optionally exports the project as a .knxproj file. Three modes are available in the settings:
Off – no automatic backup.
Once per session – before the first change in a chat (default).
Before critical actions – before every writing step.
By default, the backups are stored under “Documents\ETSpilot\Projektsicherungen”. The folder and the number of backups kept are configurable; older ones are removed automatically. While writing, ETS briefly stops responding – for large projects this can take a few seconds.
Undoing changes
To restore an earlier state, import the desired backup in ETS via “Import project”. You can also request individual changes directly, for example “Rename the addresses you just changed back to what they were” – the assistant knows the chat history.
Documentation › Working with the assistant
Planning documents and project settings
You can store documents for each project – distribution board plans, room lists, quotations, customer requirements. The assistant searches them and quotes from them specifically.
Project folder
Open via the folder button in the chat bar or in the portal under “Project” › “Documents”.
Formats: PDF, Excel (XLSX/XLSM), Word (DOCX), CSV, TXT, MD, JSON, XML and e-mails (EML).
Up to 25 MB per file and 50 documents per project. Attachments from the chat are automatically placed in the project folder.
Individual files can be excluded from the AI context without deleting them.
The assistant initially only receives a table of contents with file name, page count and short description and loads content as needed. This keeps even extensive documents usable. The documents are stored encrypted on our server in Germany.
Instructions for the project
Under “Project-specific settings” you store a text that the assistant takes into account with every request – for example naming conventions, preferred manufacturers or special features of the installation. The instructions can also be maintained in the portal.
Data locks
For each project you define which data types must never leave the computer – such as topology, devices, group addresses, parameters, building structure, security keys, bus communication, documents or the chat history. Locked data is neither transmitted to the AI nor made accessible via tools.
Documentation › Working with the assistant
Photos and voice
Sending photos to the assistant
Put a photo directly into the chat, for example of the distribution board. The assistant reads out the visible devices, matches them with the product catalog, presents the result for confirmation and then adds the devices to the project.
Formats JPG, PNG and WEBP, up to 4 images per message and 4 MB per image.
Images are not stored permanently but are only part of the respective request.
The selected model must be able to process images.
Dictate
Next to the paper clip there is a microphone. One click, you speak your instruction, and the text lands in the input field and adds to what you have already typed.
Recognition is handled by the Windows online service; the voice recording is transmitted to Microsoft. For this, online speech recognition must be switched on under “Settings” › “Privacy & security” › “Speech” and a suitable language pack must be installed. If this is not the case, ETSpilot explains where to set it on the first attempt.
Smartphone app
You pair the app for iOS and Android via QR code using “Cloud connection” in the chat bar. It offers chat, building, groups, diagnostics with bus monitor and settings – handy during commissioning on site.
Documentation › Working with the assistant
Reconstructing existing installations
If the project file of an installation is missing, ETSpilot reads the devices from the bus and builds an editable project from them again. The bus is only read – nothing is programmed or switched.
Procedure
Create a new, empty project and select the bus interface in ETS.
In Agent mode, give the task, for example “Read out line 1.1 and build me a project from it.”
ETSpilot scans the line and takes over each device found one after another.
At the end you receive a summary per device with the match and open points.
What is taken over
Device: The product is identified via its application program in the ETS catalog – even if the product data has not yet been imported – and created with its individual address. Missing areas and lines are created along with it.
Group addresses: The group address and association tables are read from the device, and the addresses are created and linked. The names are derived from the group objects, e.g. “Channel A: Switching (1.1.2)”; the main groups by function such as switching, shading, dimming or heating.
Parameters and flags are recovered from the device memory. The result states what percentage of the memory matches.
Limitations
If several order numbers match the same application program, ETSpilot names the alternatives; you confirm the exact variant.
Values that cannot be determined unambiguously are marked as approximations. Check them on site.
Some devices do not allow parts of their memory to be read; these areas are indicated.
Devices with KNX Data Secure cannot be read without their key. Devices that do not accept a connection are listed.
Afterwards you can have the group addresses renamed according to your scheme and the devices assigned to rooms.
Documentation › Logic editor
Logic editor – Overview
You assemble recurring tasks as a graphical script made of blocks, save it and run it again on any project – for example naming group addresses by room, setting parameters of many devices consistently or checking a project.
Four steps
Build: drag blocks from the palette and plug them together – or ask the assistant to draft the script.
Preview: shows every planned change without changing anything.
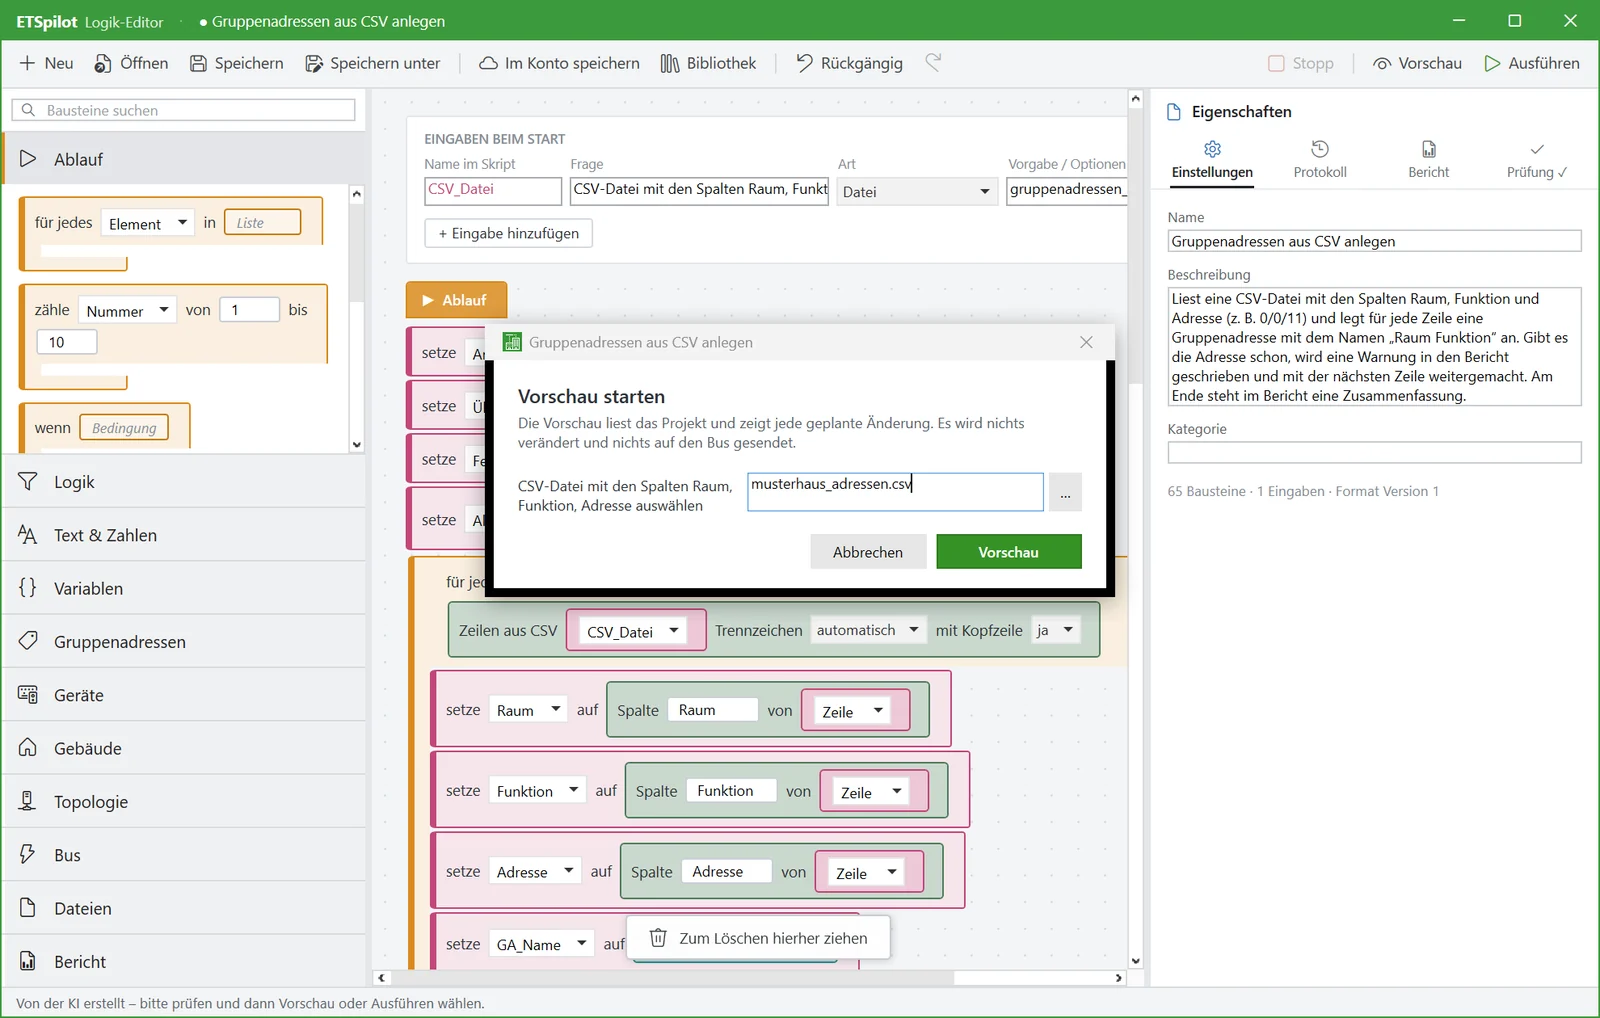
Run: inputs such as room or file are requested at start; a project backup can be created beforehand.
Report: results, warnings and errors as a table, exportable as CSV.
Fig. 7 – Inputs when starting a script
Scripts from the assistant
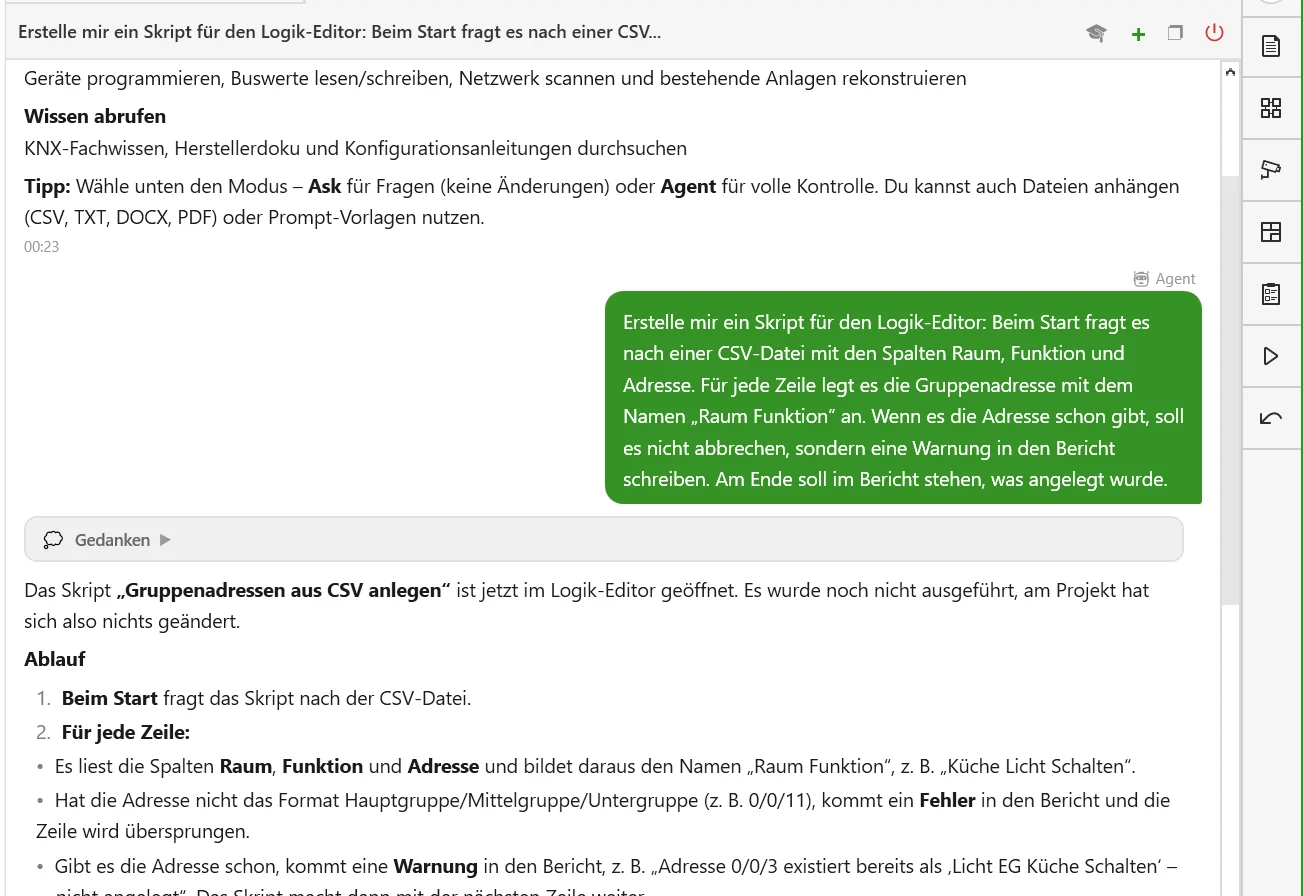
Describe in the chat what the script should do. The assistant drafts it, checks it automatically with a preview against your project and opens it in the editor for review.
Make me a script that lists all actuators without a room.
Script with a loop over the devices and a report line per match – checked and opened in the editor.
Fig. 8 – Script suggestion from the assistant
Library and templates
You save good scripts in the library or in your account and share them with your team. Included templates are “Name group addresses by room”, “Addresses without a sender”, “Import room schedule”, “Standardise parameters”, “Devices without a room” and “Reconcile ETS group addresses”.
Variables and inputs
Loops and blocks with “as” store their result in a variable. In texts you insert values with placeholders, for example {ga.name} or {room} light {i}. Inputs requested at start are available in the script under their name.
Documentation › Logic editor
Blocks from A to Z
All 76 blocks in eleven groups. You fill free fields () with a value or another block. Blocks marked “changes the project” appear in the preview as a planned change; bus blocks are not executed in the preview.
Flow 8
Block
Description
for each in
Repeats the blocks inside for each element of a list; the variable holds the current element.
count from to
Counting loop from a start value to an end value, both limits included.
if
Runs the blocks inside if the condition is true, otherwise the optional “else” branch.
try (error text in )
Runs the blocks inside. If one fails, the error message is stored in the variable, the “on error” branch runs and the script continues.
continue with next
Skips the rest of the current loop iteration.
stop script
Ends the script without an error.
wait seconds
Pauses for up to 600 seconds, e.g. between telegrams.
note:
Note in the script; has no effect.
Logic 6
Block
Description
Compares two values – as numbers if both sides are numbers, otherwise as text, ignoring upper and lower case.
Checks a text for “contains”, “starts with”, “ends with”, “equals” or a pattern (regular expression).
and
True if both conditions are true.
or
True if at least one condition is true.
not
Inverts a condition.
is empty
True for empty text, an empty list or a missing object.
Text & numbers 10
Block
Description
text
Text with placeholders such as “{ga.room} light {i}”; {variable} and {variable.property} are replaced.
join
Joins two texts without a separator.
replace with in
Replaces one part of a text with another.
replace pattern with in
Replaces using a pattern (regular expression); $1 refers to groups in the pattern.
find pattern in
Returns the first match of a pattern (or its first group), or empty text.
part of split by
Returns one part of a delimited text; 1 = first part, negative numbers count from the end.
as
Converts to upper case, lower case or capitalised words.
with digits
Pads a number with leading zeros, e.g. 7 → “07”.
Calculates with two numbers: +, −, ×, ÷ or remainder (mod).
count of
Number of elements in a list or length of a text.
Variables 10
Block
Description
set to
Assigns a value to a variable.
increase by
Increases a number in a variable.
add to list
Adds a value to a list; the list is created the first time.
Reads a variable or an input of the script.
of
Reads a property of a project object, e.g. name, address, room or flags. Lists such as group objects can be used in loops.
first of where
Returns the first matching element of a list – typically for looking something up in a CSV table.
all of where
Returns all matching elements as a new list.
sorted by
Sorts a list: numbers numerically, addresses such as 1/2/10 by their parts, everything else alphabetically.
without duplicates by
Removes duplicates, keeping the first element in each case.
item of
Returns an element by its position; 1 = first, −1 = last.
Group addresses 14
Block
Description
group addresses in matching
Group addresses of the whole project or of a main or middle group, optionally filtered by name or address.
all main groups
All main groups of the project.
middle groups in
All middle groups of a main group.
group address
A group address by its address (e.g. 1/2/3) or its unique name.
rename to
Renames a group address. changes the project
set description of to
Sets the description of a group address. changes the project
set datapoint type of to
Sets the datapoint type, e.g. 1.001 or just the main type 1. changes the project
create group address in no. as
Creates a group address in a middle group – with a fixed number or the next free one. changes the project
create group in no. as
Creates a main group, or a middle group within a main group. changes the project
rename group to
Renames a main or middle group. changes the project
move to no.
Moves a group address to another middle group. changes the project
delete
Deletes a group address. changes the project
link to sending
Links a group address to a group object, optionally as the sending address. changes the project
unlink from
Removes the link between a group address and a group object. changes the project
Devices 10
Block
Description
devices in matching
Devices of a line, area or room, optionally filtered by name, order number, product or manufacturer.
device
A device by its individual address (e.g. 1.1.5) or its unique name.
group objects of matching
The active group objects of a device, optionally filtered by number, name or function.
rename device to
Renames a device. changes the project
set description of to
Sets the description of a device. changes the project
assign to room
Assigns a device to a room. changes the project
set parameter of to in channel all channels
Sets a parameter for one channel or all channels. Name and value as in the ETS; the value is checked against the permitted range. changes the project
parameter of in channel
Reads the current value of a parameter as the ETS displays it.
set flags of : communication read write transmit update read on init
Sets the flags of a group object (Communication, Read, Write, Transmit, Update, Read on Init) individually to on, off or unchanged. changes the project
set individual address of to
Sets the individual address of a device; it must be programmed afterwards. changes the project
Building 5
Block
Description
in matching
Building parts such as floors or rooms, optionally below a building part and filtered.
building part
A building part by its path (e.g. House/GF/Kitchen) or its unique name.
create in as
Creates a building part, such as a building, floor or room. changes the project
rename to
Renames a building part. changes the project
delete building part
Deletes a building part including everything below it; the devices remain in the project. changes the project
Topology 2
Block
Description
all areas
All areas of the topology.
lines in
All lines, or the lines of an area.
Bus 4
Block
Description
send to
Sends a value to a group address: 0/1, on/off, a number or hex bytes. Bus
read as
Reads a group address and waits up to 3 seconds for the response. Bus
program
Starts programming a device in the ETS. Bus
restart
Restarts a device. Bus
Files 5
Block
Description
rows of CSV separator with header
Reads a CSV file as a list of rows; separator and encoding are detected.
column of
Reads a column of a row by its name or number.
write row to CSV separator append to existing file
Writes a row to a CSV file – new or appended.
import group addresses from ETS CSV update existing
Imports group addresses from the ETS CSV export (3/1 and 1/1) and creates missing groups. changes the project
export group addresses as ETS CSV
Exports all group addresses in the ETS CSV format.
Report 2
Block
Description
report for
Adds a row to the results table as a note, warning or error.
write to the log
Writes a text to the log.
Documentation › Logic editor
CSV and ETS import
You process Excel lists, room schedules and ETS exports via CSV files.
Reading CSV
“rows of CSV” returns a list of rows that you iterate through with “for each”. You read a column with “column … of …” or as a placeholder {row.ColumnName}. The editor detects the separator (semicolon, comma, tab) and encoding (UTF-8 or ANSI) by itself. Without a header row, the columns are named 1, 2, 3 …
For lookups – such as old address → new name – you read the table once and use “first of … where …” to find the matching entry.
Writing CSV
“write row to CSV” creates the file anew on the first write of a run; further rows are appended. If needed, write a header row first. The preview does not write any files.
Group addresses in ETS format
Import from the ETS CSV export in the formats 3/1 and 1/1: missing main and middle groups and addresses are created with number, name, description and datapoint type. Existing ones are only updated if you explicitly switch this on.
Export of all group addresses in format 3/1 – importable into ETS and other tools.
Which files a script sees
Scripts only access files you select at start. Without a selection, they only have access to the folder “Documents\ETSpilot”.
Documentation › Logic editor
Preview and error handling
Preview
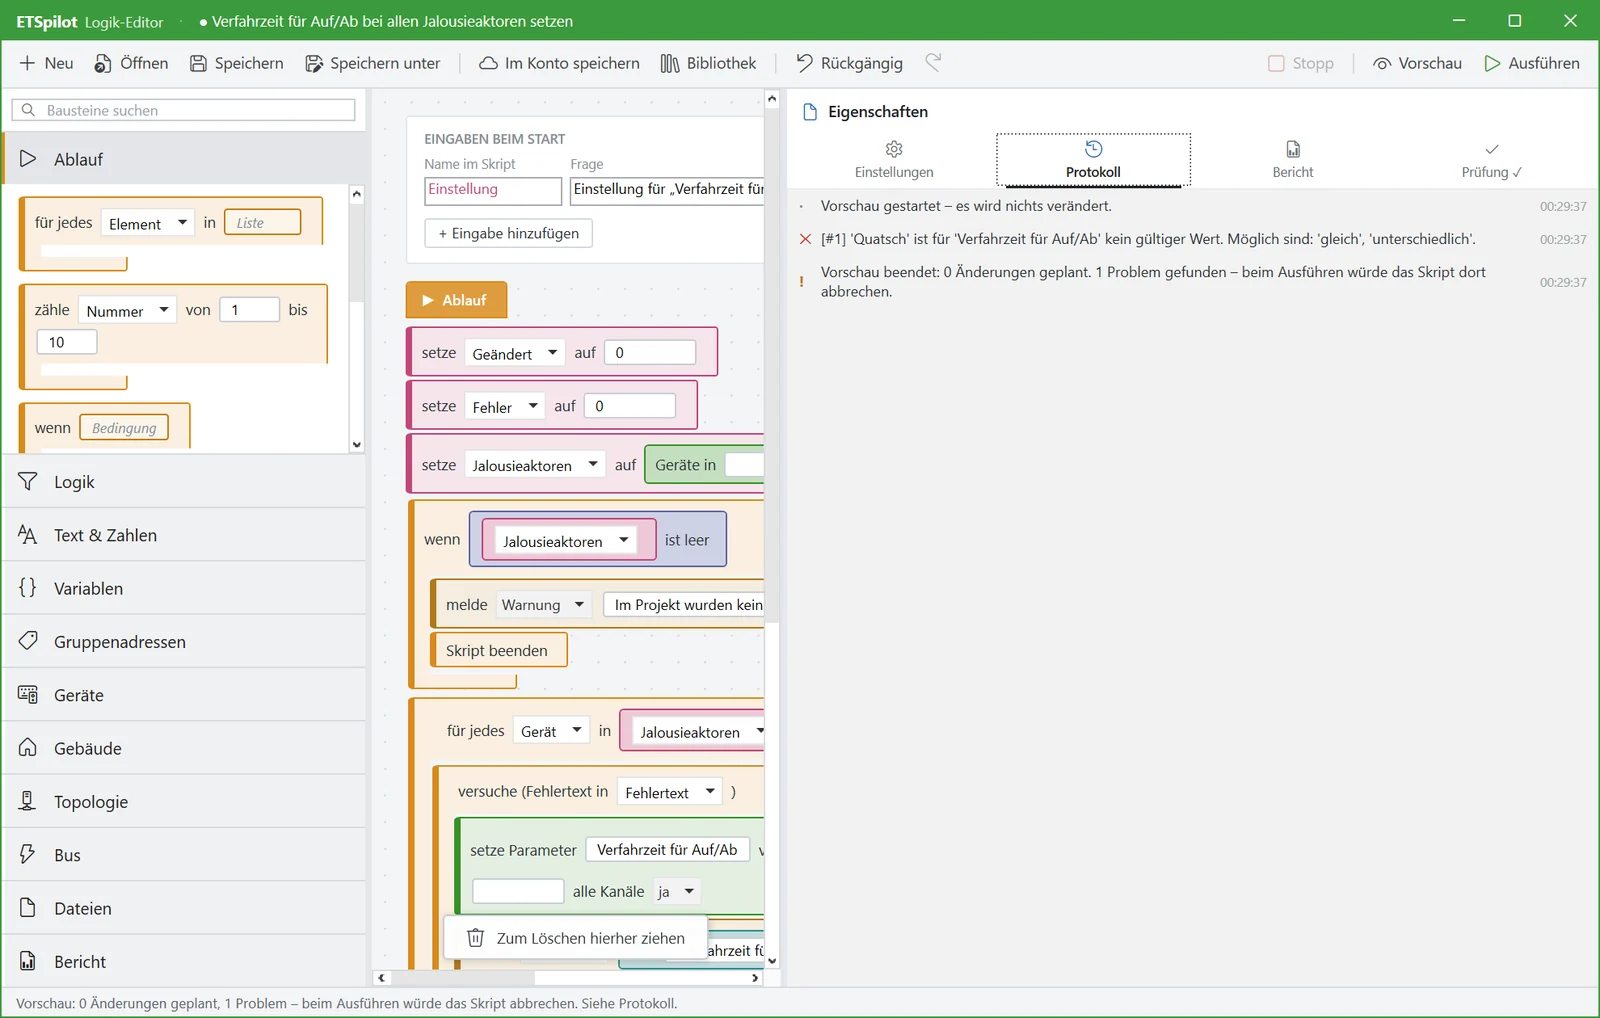
The preview runs against the real project without changing it. It lists every planned change in the log, checks parameter values, channels and the rules of the building structure and reports everything that would make the run fail – with a clear message and the permitted values.
Fig. 9 – A problem the preview finds before running
Catching errors
With “try … on error …”, a script catches errors in individual steps: the rest of the block is skipped, the error message is stored in a variable, the “on error” branch runs and the script carries on. Typically the block is used inside a loop so that one faulty row doesn't stop the whole import.
for each row in rows of CSV · try … · on error: report error {error} for {row}
All valid rows are taken over; the faulty ones are listed in the report with the reason.
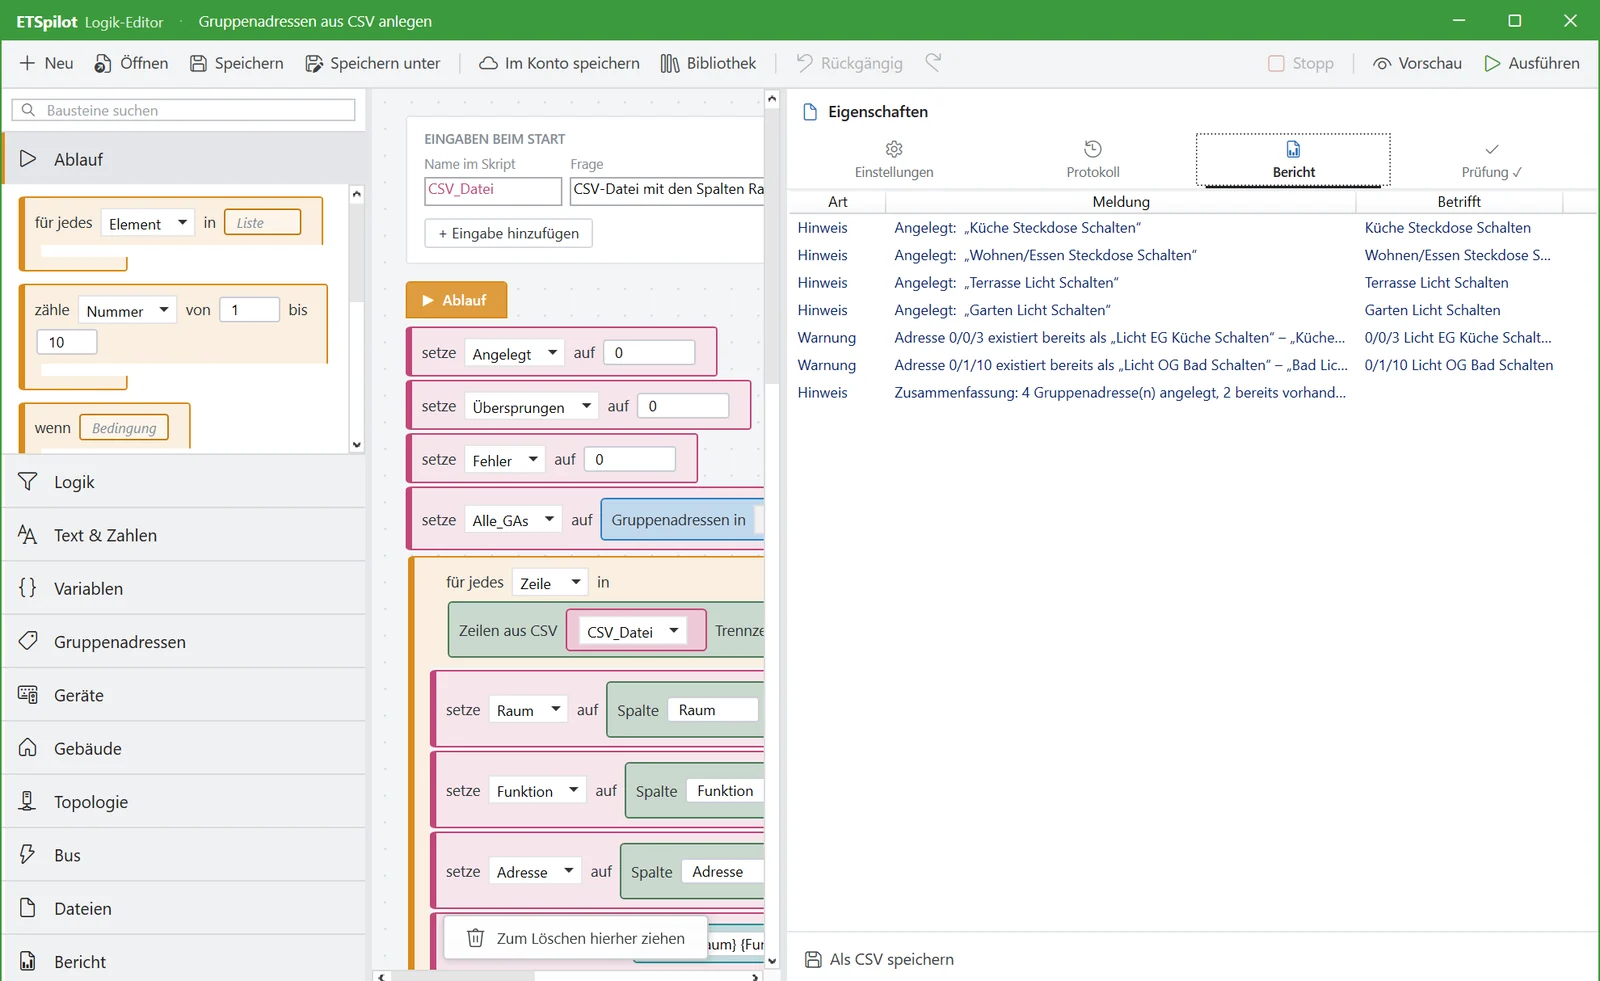
Report
“report” writes notes, warnings and errors to the results table, which you export as CSV – for customer or team. At the end you see exactly which rows need rework.
Fig. 10 – Report after running
Documentation › Collections
Release notes
ETSpilot is available as a public beta. The feature set is ready for productive use; individual functions may still change.
Version 2.1.7.0
Logic editor: graphical scripts made of 76 blocks with preview, error handling, CSV and ETS import and report.
Reconstruction of existing installations: take over devices from the bus – with group addresses, parameters and flags, read-only.
Trained manufacturer products: parameters and manuals of selected products, initially WAREMA.
Group addresses: fixed numbers on creation, datapoint types, unambiguous linking also for channel objects.
Chat: better readability and more detailed approvals for parameter changes.
Since version 2.0.1.0
Project folder for planning documents, project-specific instructions and data locks.
Sending photos to the assistant, voice input on Windows and the welcome assistant.
Automatic project backup, Azure as AI provider and the smartphone app for iOS and Android.
Information, export and deletion of your own data in the portal.
System requirements
ETS 6 on Windows, an internet connection and your own API key from Anthropic, OpenAI or Azure.
Prompt gallery
Proven tasks – with results
Which group addresses have no sender?
List with address, name, room and linked receivers – exportable as CSV.
Set the travel time of all blind actuators to 60 seconds.
List of changes per device and channel for approval, value checked against the permitted range.
Make me a script that imports group addresses from our Excel template.
Script in the logic editor, automatically checked by preview, reusable for every project.